Last night, April 14, there was a total lunar eclipse. I have been meaning to start this blog for a while now, and this seems like an opportune time to get started. I can back-fill some of the earlier posts that I have been intending to write after I post this one.
One hobby that I have recently become very fascinated/obsessed with is astronomy and astro-imaging. The eclipse last night gave me an excellent opportunity to get out on the back deck and do some observing and imaging.
My back deck isn’t actually all that great of a location from which to observe and it particularly isn’t a good location for imaging. It has the tremendous advantage of being extremely convenient, but it has some major drawbacks: one, is that the house completely blocks the view to the north. We live on bit of a hill looking down onto a park, so I have a pretty unobstructed view to the south, but can’t see anything to the north at all. This isn’t a problem for viewing the planets or the moon because they are all in the southern sky, but it is a big problem for seeing many of the interesting deep space objects (DSOs) like galaxies and nebula.
The second drawback is that because it’s a deck, and not firmly on the ground, vibration is a huge problem. This doesn’t matter as much for visual observation, but is a big problem for imaging. There can’t be any movement on the deck at all during the exposure, so that pretty much limits me to exposures of a few seconds. This makes imaging DSOs pretty hard to do since exposures typically need to be several minutes. Exposure time isn’t generally an issue for lunar photography though, as the exposure times for photographing the moon are very short. The moon is very bright.
The other major drawback to observing from my back deck is the light pollution from the town. The town that we live in isn’t all that large, but it is large enough to produce enough light pollution to make it difficult to see faint objects in the sky.
So, all told, my back deck isn’t that great a place to engage in astronomy, but it is where I have been doing most of my observing because it is incredibly convenient.
The weather forecast for the night had been pretty marginal all day. It had called for an overcast sky until around 10PM and then partly cloudy the rest of the night. I started setting up at about ten PM. The telescope that I used was my Celestron NexStar 6SE. This is the scope that my wife gave me for Christmas last year and is what got me started on astronomy.
The equipment list for the setup looks like this, and the set up takes about fifteen or twenty minutes:
- NexStar 6SE Telescope
- f6.3 focal length reducer/field flattener
- Diagonal for eyepiece attachment
- Canon T3i digital SLR camera body
- Canon EOS lens mount T-ring adapter
- Celestron 1 1/4″ T-ring to eyepiece adapter
- Asus UX32A notebook computer
- miscellaneous power adapters, cables and so on to hook it all up
I use a program called Nebulosity to control the camera and acquire the images. It is really intended to be used for imaging deep space object objects, but it works fine for grabbing images of the moon as well.
The NexStar 6SE telescope is a 6″ (150mm) Schmitt-Cassegrain type. It has a focal length of 1500mm and a focal ratio of f10. With the focal reducer/field flattener installed, it has an effective focal length of 945mm and focal ratio of f6.3. This makes it pretty much equivalent to a 945mm, f/6.3 telephoto lens. Effectively, the difference between the telescope and a normal camera telephoto lens is that when using the eyepiece diagonal, the image is inverted top for bottom, and so I have to reinvert the images in the post processing. I can attach the camera to the telescope without using the diagonal, but I used it in this case because sometimes the camera body will hit the telescope mount when imaging things at a high elevation in the sky.
The T3i camera has an APS-C sized sensor, which gives it a scale factor of 1.6x compared to a camera with a full sized sensor (or a 35mm film camera, which is where the standard comes from). This means that the image produced by the camera will be magnified by 1.6x over the image that would be produced by the same lens in a camera with a full frame sensor. Another way of saying this is that the lens behaves as if it had a focal length 1.6 times as long as it would in a full frame camera.
In 35mm film cameras (and digital SLR cameras with a full sized sensor), a 50mm lens is considered “standard”. This is because a 50mm lens gives approximately the same angle of view as the human eye. 50mm is thus considered to be the “standard” 1x lens focal length. A longer focal length than 50mm will produce a telephoto effect and a shorter focal length than 50mm will produce a wide angle effect. When taking this into account, the telescope has an effective focal length (for an APS-C sized sensor) of 1512mm.
When all of this is taken into account, and one does the math, the end result is that the telescope and camera have an effective magnification of 30x in this configuration; meaning that the images produced appear 30 times larger than the same scene does to the naked eye.
When I started setting up, the sky was partly cloudy with some clear patches. After I got all set up, I shot the following image (you can click on any of these images to see a higher resolution version):
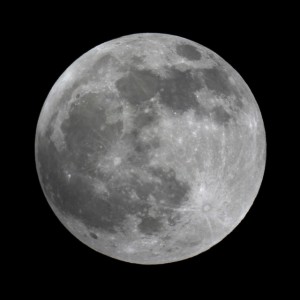
This is, obviously, a full moon. It was shot through a hole in the clouds at 10:22 local time. This was a 1/1000 second exposure at an equivalent film speed of ISO 200. In this picture, the prominent, rayed crater in the lower right of the moon is Tycho. There is another rayed crater just to the left of center, which is Copernicus. These two are the most prominent and obvious impact craters on the moon’s face. They aren’t the largest, but with the ray patterns, they stand out the most.
The oval dark patch at the very top-right, is Mare Crisium. The three dark patches below it are, from right to left, Mare Fecunditatis, Mare Tranquilitatus and Mare Serenitatis. The middle one, almost directly below, and slightly to the left of Mare Crisium is Mare Tranquilitatus, which is where the Apollo 11 moon landing took place. This image pretty much shows what a full moon always looks like.
The eclipse was supposed to start at around 11:00PM local time, and at around 10:45, some big clouds started moving in and it was looking pretty grim. I stuck it out and started taking pictures through the clouds at about 11:00. Starting at 11:00PM local time, I shot one frame per minute, approximately on the minute. For a while, I was shooting the moon through the clouds and some of the shots didn’t come out all that well. There were several holes in the clouds that came by and for some of the shots, I was able to shoot through the holes. Then about twenty minutes, or so, into the eclipse, the sky started to clear up and before long, it was almost perfectly clear.
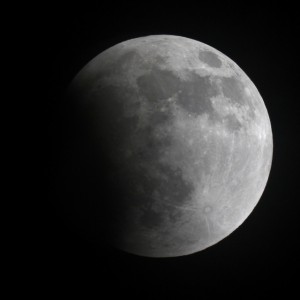
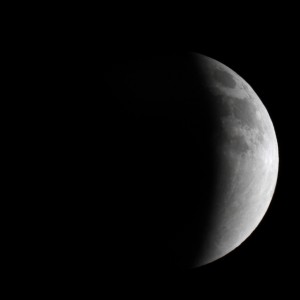
This next picture was taken at 11:10PM, which was about ten or twelve minutes from the onset. This is one of the early images shot through a hole in the clouds. You can clearly see that the Earth’s shadow is starting to move across the moon’s face. This was a 2/1000 second exposure at ISO 400.
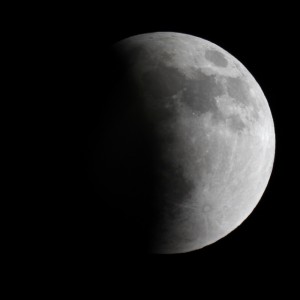
Next, we have one taken at 11:25PM. The Earth’s shadow is a bit more than a third of the way across the moon’s face at this point. By this time, the clouds were receding and the sky was becoming much clearer. From this point on, I wasn’t shooting through holes in the clouds anymore and there were no more clouds in a position to get in front of the moon. This image was also shot at 2/1000 second at ISO 400.
This one was shot at 11:35:
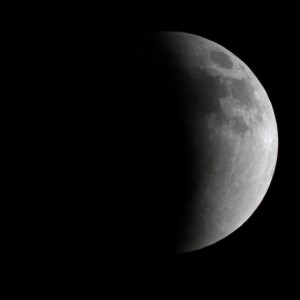
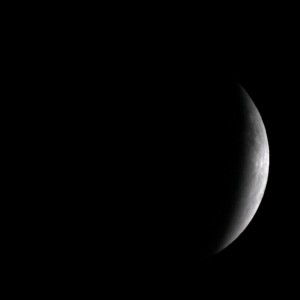
This one was taken at 11:44 and we’re about two thirds of the way to totality.
Here’s one taken at 11:56 and w’re getting pretty close to totality.
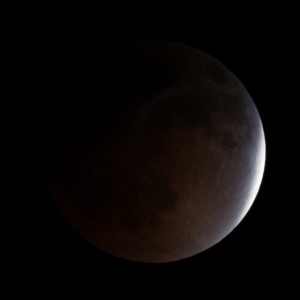
This next one was taken at 12:03AM on Tuesday, April 15. This illustrates something very cool that happens in a lunar eclipse. As the eclipse approaches totality (I started noticing it when the moon was between half and two-thirds into the Earth’s shadow) the non-illuminated portion of the moon’s surface starts to have a reddish glow. It’s fairly faint and dim and you can’t see it until enough of the moon’s bright glow has been extinguished; but as the eclipse progresses, it becomes more and more noticeable. For this photo, I used a much longer exposure to get the glow to start to show up in the photo. The human eye has much greater dynamic range than the sensor in a digital camera and we can see things that just can’t show up in a photograph. For this photo, the exposure was 1/2 second at ISO 400. The little sliver of the moon on the right that still hasn’t gone into the Earth’s shadow is very overexposed and totally washed out.
Here is another photo shot at 12:04AM that illustrates the reddish glow even more clearly. At this point, the eclipse is effectively total. There is the very narrowest sliver on the right that is still partly illuminated by the sun, but the moon is now effectively entirely in the Earth’s shadow. This is a 2 second exposure at ISO 400.
Another cool thing that happens during a total lunar eclipse is that as the moon becomes fainter and fainter, the sky becomes darker and darker and more and more stars come out. A full moon is very bright and really washes out the sky, making it impossible to see faint stars. In fact, with a full moon out, you’re pretty much limited to being able to see first and second magnitude stars. As the moon gets fainter, the sky starts to light up with more and more stars.
At the time of this eclipse, the moon was in the constellation Virgo. The brightest star in Virgo is Spica, and during the eclipse, Spica was to the right of the moon by approximately the same angular width as the moon. It wasn’t possible to see Spica at all until about halfway to totality; and then, there it was, a fairly bright star sitting right next to the moon. Spica (also known as Alpha Virginis) is a magnitude 0.98 blue-white giant that is about 260 light years from earth.
If you were out last night looking at the eclipse, you probably noticed a very bright reddish “star” up and to the right from the moon. That was Mars, which is also in the constellation of Virgo right now. You may or may not have noticed a fairly bright, whitish “star” down and to the left of the moon about the same amount that Mars was above and to the right. That was Saturn, which is in the constellation of Libra currently.
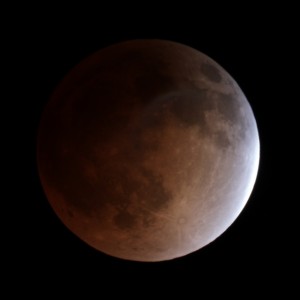
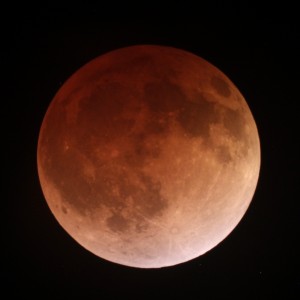
The following picture was taken when the eclipse was well into totality. This was taken at 12:39AM, and was a 6 second exposure at ISO 800.
This really shows off the reddish hue of the moon during an eclipse. So, what gives the dim reddish hue to the moon? Essentially, it’s the same thing that causes a sunset to be red. The sun’s light is shining through the Earth’s atmosphere and being refracted, or bent inward. The angle of refraction is dependent on the color of the light (just like happens in a triangular prism), and the red color is bent the most. The red part of the sun’s spectrum is bent inward enough that some of it strikes the moon and gives it the reddish hue.
I shot 153 images of the moon last night, with the last one being at 12:42AM. By that time, I was too tired and too cold to stay out any longer. After the sky cleared, it started getting cold. For the last hour or so that I was sitting on my back deck looking at the moon, it was down to about 34 degrees F. I started packing things up at about 12:45 just after I shot my last photograph.
I had everything packed up and was just about to head upstairs to bed, when my son Mark unlocked the front door and came in. He had been out visiting friends and had just gotten home. He and I went out onto the back deck together and took one last look at the moon and the stars, and then I went to bed.
